Thursday, September 30, 2010

Promises

The character of a person is the total of their attributes, traits and abilities that determine and at the same time are expressed in the unique way of behavior, thought and reactions of that person. A trustworthy person, a manipulative person, an ambitious person, an impatient person, a person of good character. We all go through life meeting people that we deem either good or bad, worthy or unworthy of our company, love or friendship, people we can depend on and people we know that are going to let us down.


We all judge others by their words, actions and reactions and everyone has their own standards by which they evaluate those around them. I guess most would say that what they look for in others is honesty and I would agree. But what is also very important to me, is that a person keeps their promises.


I try to never promise anything I can't deliver and I really hate it when people do otherwise. Is it so difficult to be consistent and at least try to maintain some level of accountability? Well, sometimes it is. I mean, there are exceptions. There are times that not keeping your promise is kind of fun.


What if somebody promises you a white cornmeal bread and instead offers you a feta-stuffed Greek bread? What if somebody promises you a vegetarian dish with peas and dill and instead offers you a spicy Indonesian salad? What if somebody promises you a chocolate tart and instead offers you a goat's cheese tart with honey and a pistachio crust? What then? Don't blame me. Blame my mad culinary impulses. It's only food after all.


And what do you do with food? You simply enjoy it! Listen, I know that a chocolate tart sounds tempting but this tart is better, believe me. It's more complex than a chocolate tart, creamier, more refreshing, more gutsy. Even though this is not a Greek recipe, it contains ingredients that are often used in Greek desserts—goat's cheese, Greek yoghurt, Greek thyme honey, pistachios—and it actually reminds me of the classic Greek treat of simple strained yoghurt dressed with lots of honey and sprinkled with chopped walnuts.


Greek strained yoghurt is known everywhere for its creaminess and its exquisite quality and Greek honey has been valued since ancient times both as food and as a medicinal source. The ancient Greeks considered honey to be a natural, healthy and essential part of their everyday diet rather than a supplement, and it was eaten on its own or added to different kinds of sauces. There are innumerable references to honey in ancient Greek historical and philosophical texts such as Homer's Iliad and Odyssey, the "Deipnosofists" by Athenaeus and texts by Plato and Aristotle. According to Greek mythology, honey was the nectar of the gods and Zeus was raised on honey.


Greek honey is considered to be one of the greatest in the world largely due to the rich variety of fragrant, indigenous flowers of the Greek countryside and mountains and the unlimited supply of sunshine. The biodiversity of the Greek countryside contributes to the fact that there are multiple types of honey, each with its own particular properties and flavor. Greek honeybees devour the nectar from the fragrant oregano and rosemary plants, from chestnut trees and the delicate orange and jasmine blossoms, and of course from wild thyme flowers, making wild thyme honey unique to Greece.


Greek wild thyme honey, with the finest one being from the island of Kythera, is intensely aromatic, it has a light golden color and an incomparable rich and deep flavor that can't be described. It's something you have to taste. When some friends from Holland tried the thyme honey I have brought from Greece, they couldn't believe that honey could have such an extraordinary taste.


The same thing can be said about the Greek pistachios or as we call them in Greece "Fystikia Aeginis", which means nuts from the island of Aegina. Aegina is a beautiful, green island located very close to Athens where pistachios have been cultivated since the 1860s. "Aegina pistachio" is the official name of this pistachio variety which is also called "kilarati" meaning round. I'm always amazed by the sight of the fresh pistachios hanging from the trees in Aegina—they develop such a gorgeous red-pink color where the sun hits them.


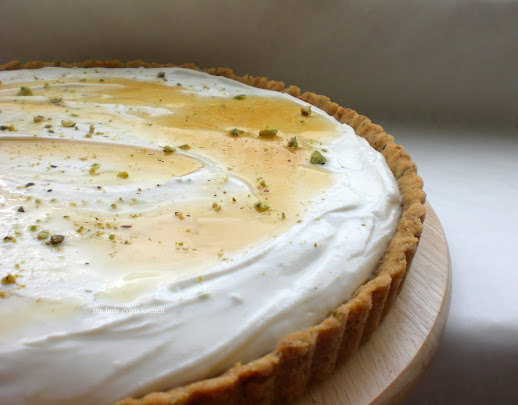
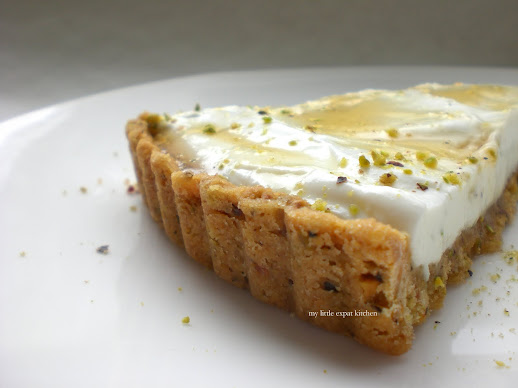
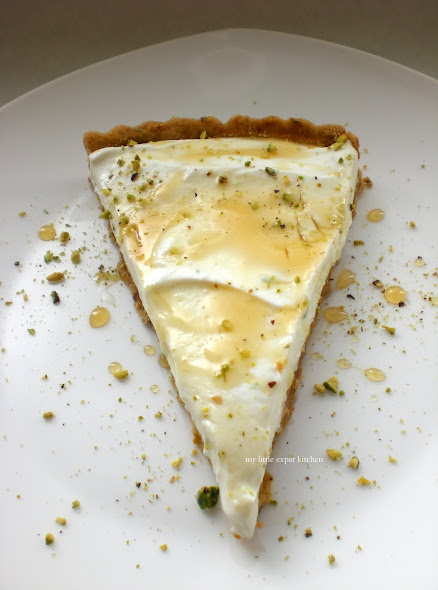
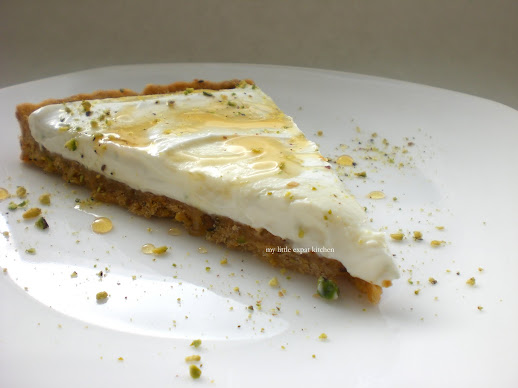
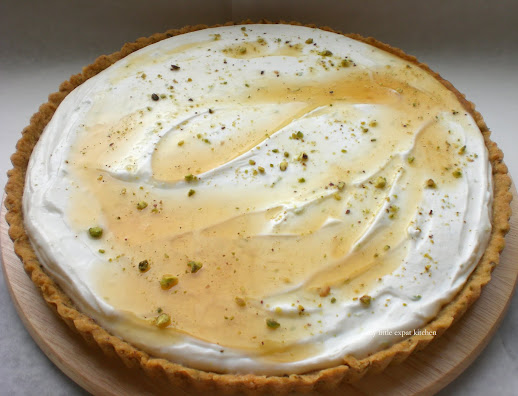
Now, this tart over here with all these ingredients can only taste fantastic, don't you think? It has a honeyed sweetness and an earthiness from the thyme as well as a slight tanginess from the yoghurt and goat's cheese, with the acidity of the lime balancing the buttery and nutty flavor of the pistachio crust. This tart is all about textures—the fluffy cheese-yoghurt cream, the biscuit-like crust, the sticky, luscious honey and the crunchy pistachio crumbs on top. All that in one bite. And you'd think that they would constitute a heavy result but nothing can be further from the truth. It is light, refreshing, totally delicious and something that you have to make immediately.


Goat's Cheese and Greek Yoghurt Tart with Thyme Honey and a Pistachio Crust
Adapted from Food & Wine

The Greek fresh soft goat's cheese called Manouri (produced traditionally in central and west Macedonia and Thessaly in northern Greece and the island of Crete) with its silky smooth texture and milky, slightly citrusy flavor, is one of the best choices for this tart. If you can't find it, a great substitute would be a French chevre or any other high-quality soft goat's cheese.

You can play around a lot with the flavors of this tart. You can use orange blossom honey instead of Greek thyme honey which will give a slightly different flavor to the dessert.
You can use lemon juice and zest instead of lime. Lemon has a milder flavor than lime and this will be reflected on the overall taste of the tart.
You can use walnuts or pecans instead of pistachios for the crust.
(Read this on how to store nuts properly)


Yield: 1 tart (28 cm in diameter)

Ingredients

for the tart base/crust
70 g unsalted shelled pistachios, plus extra for sprinkling over the tart
115 g unsalted butter, softened
115 g granulated sugar
½ tsp pure almond extract
½ tsp salt
180 g all-purpose flour

for the tart filling
310 g soft goat's cheese
500 g Greek strained yoghurt, full fat or 2% fat
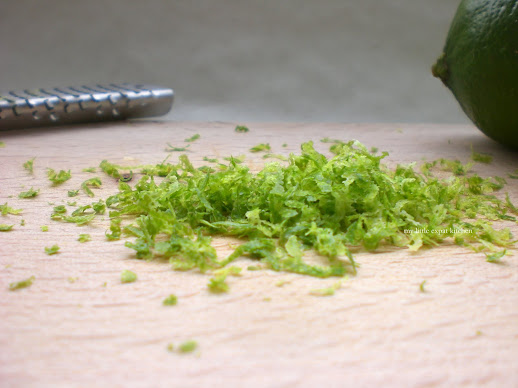
2 Tbsp lime juice, freshly squeezed
2 tsp lime zest, finely grated
80 g icing sugar

120 g thyme honey, preferably Greek

Special equipment: fluted tart pan 28 cm in diameter and 2 cm deep with removable bottom, small food processor, stand mixer or hand held mixer


Preparation

for the tart base/crust
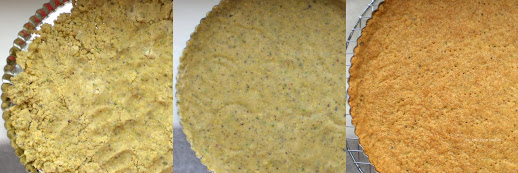
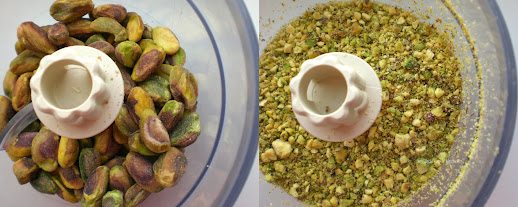
In a small food processor, add the pistachios and process them to fine crumbs (it's ok if there are some larger pieces in there as well). Be careful not to grind them too finely because they will become too oily and pasty.


In the bowl of a stand mixer fitted with the paddle attachment (or with a hand held mixer), beat the butter with the sugar at medium speed until pale, for about 1 minute. Add the ground pistachios, almond extract and salt and beat at medium speed until combined. Add the flour and beat at low speed until incorporated and the dough is crumbly (it will be very crumbly but once you start spreading it inside the tart pan it will come together beautifully).

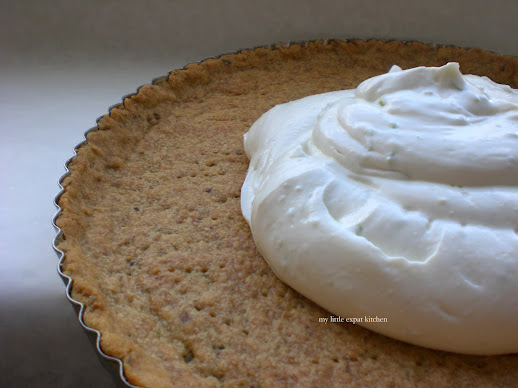
Scrape the dough in the middle of a 28 cm in diameter fluted tart pan. Using the back of your hand or the bottom of a glass, press the dough over the bottom and up the sides of the tart pan. Try to spread the dough as evenly as possible and don't worry about creating an overhang because the dough will not shrink when baked. Place tart in the refrigerator for 30 minutes to chill.

Preheat your oven to 150 degrees Celsius.

Take the tart pan out of the fridge and prick the dough all over with a fork. Bake the crust on the middle rack of the oven for 40-45 minutes, until lightly golden. Once cooked transfer tart pan to a wire rack to cool completely.

for the tart filling
In the bowl of the stand mixer fitted with the paddle attachment (or with a hand held mixer), beat the goat's cheese, yoghurt, lime juice and lime zest at medium speed until combined. Add 
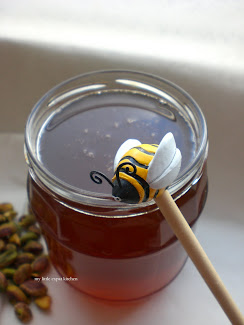
the icing sugar and beat at medium speed until you have a smooth, fluffy and homogeneous mixture.

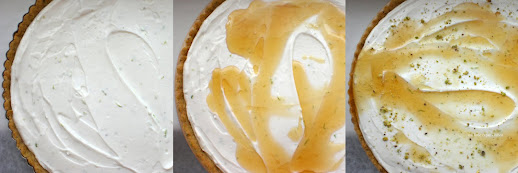
Scrape the filling into the baked and completely cooled crust and refrigerate for 2 hours so the filling sets.

Just before serving, place the thyme honey in a small saucepan and heat it over medium heat until it foams. Then pour it all over the filling of the tart and let it stand for a couple of minutes. Sprinkle with the extra pistachio crumbs, cut the tart into wedges and serve immediately.

The tart is best eaten the same day that it has been prepared because then, it is more fluffy and light. The longer it stays in the fridge, the firmer the filling gets and it will have a different texture (which is not necessarily bad).

You can keep the tart for 2 days in the fridge, covered with cling film. Keep in mind though that the crust will lose its crumbly, biscuit-like texture each day it remains in the fridge, because of the moisture, thus becoming softer.


Sunday, September 19, 2010

The Spiral

How do you know that your man loves you? Well, I guess there are different criteria for different people. For me, it is when he joins me to a Woody Allen marathon at a downtown Athens movie theater and stands to watch three films in a row. It is when he comes home from work, having stopped first by a bookstore, and handing me ten cookbooks that he thinks I would love.


It was when he let my cat take a nap on his chest even though he was (and still is) allergic to cats. It is when he gets up in the middle of the night to put socks on my feet when I complain that I'm cold. It is when he puts up with Sunday mornings spent at food festivals.


Food festivals may as well be a sort of a nightmare for S, or so he claims. I have a sneaking suspicion that he secretly enjoys them but that he's just too apprehensive to admit it because he knows I'll drag him to even more events. So, last weekend I dragged him to yet another food fest, in Rotterdam this time.
What's so bad about food fests anyway? Ok, it might be just a tad annoying being around people who are constantly oohing and aahing over the sight of baby courgettes and the latest yield of fresh garlic, but you get to go where the good food is. And S loves his food.


Is it bad to walk around a place and suddenly see this in front of you? Um no, not in my book. S is a hard-core carnivore so his heart skipped a bit when he spotted it and he certainly didn't mind the fact that loads of sausages were being sold and grilled around there as well.


When we arrived in front of a beer stall that sold the locally brewed beer Pelgrim (the only brewery in Rotterdam) well, I think I saw a few tears in his eyes. That beer was so good. I, on the other hand, got excited when I caught a glimpse of all the cheese over at the cheese stands (I can't help it, I'm such a cheese fiend), drooled over the local honey (it was good but Greek honey is better), I perused the chocolate stalls for more than fifteen minutes lusting after all the chocolate candies and chocolate lollies (I couldn't help but buying a few, even if they did cost 1.20 euros a piece!) and I checked out the bread stalls, sampling pieces from various loaves and managing to restrain myself and buying only one.


Speaking of bread, I'm sure you have been feasting you eyes on these little beauties over here. Now that's what I call bread—Greek bread, Greek feta-filled bread, Greek bread from Mount Pelion in Central Greece. That gorgeous, bountiful area of Greece that produces one of the best varieties of apples called "firikia", a rare variety of wild grapes called "strawberry grapes", mushrooms and truffles, chestnuts and chestnut honey, wine, the tastiest "spoon desserts" (preserved fruit or vegetables) and the most robust-flavored and delicious sausages made from goat, sheep and pork meat.


This spiral-shaped, feta-filled, white Greek bread or "Tyropsomo" (cheese bread) as it is called in Greek is amazing. When I was growing up, I remember these being sold at every local bakery in Athens but unfortunately, nowadays, they are scarce. They have been substituted by "easy", ready-made breads, rolls and cheese pies that are so generic they taste exactly the same no matter which bakery you buy them from.


These over here though are completely different; these are the real thing. These individual coiled breads are 13 to 15 centimeters in diameter but they can also be baked as a large coil. The dough is a cinch to prepare and the feta, well; the feta is simply crumbled into a beautiful filling. Use your hands for this. There's nothing better than licking your fingers right after you've crumbled some feta. The crumb of the bread has a soft, fluffy texture and an airy, light quality, and the crust is pleasantly, but not overly, crunchy.


This snail-looking bread is filled with a generous amount of feta and that is what makes it special. It is not a plain bread that you use to mop up sauces of stews and braises (though you can) but more of a breakfast bread, a lunch bread, a bread that you can eat on its own (as another Greek cheese pie) or accompanied by a salad to make the ideal light dinner.


Eaten straight out of the oven, while the feta is still melted and luscious, is divine. Eaten the next morning, just before heading out to work, is even better. Eaten with a side of late summer tomatoes (these tomatoes rock!) with olive oil, sprinkled with Greek dried oregano and paired with red onions, is perfection. Eaten in the form of a sandwich, filled with rocket leaves and a hint of balsamic or red wine vinegar, is like you've died and gone to heaven. Is there anything more you can ask of a spiral of bread?


Tyropsoma (Greek individual feta-filled bread coils / spiral breads)
Adapted from Vefa's Kitchen

You can make these breads either by hand or with the help of a stand mixer. I prefer kneading the dough by hand since I feel I have a better handle on it.
These breads doesn't need a lot of work but they do need a total of 1 hour and 40 minutes proofing time.
You can either make four individual bread spirals, like I did, or make one large spiral.


Yield: 4 coiled breads, around 15 cm in diameter each

Ingredients
175 g strong bread flour
175 g all-purpose flour plus extra for dusting
1 heaped tsp salt
1 Tbsp sugar
7 g instant yeast
4 Tbsp (60 ml) olive oil plus extra for greasing the bowl and brushing the breads
120 ml lukewarm full-fat milk
1 egg white (from a medium-sized egg)
5 Tbsp (75 ml) lukewarm water
400 g feta cheese, crumbled
1 egg yolk (from a medium-sized egg)
1 ½ Tbsp sesame seeds

Special equipment: fine sieve, pastry brush, rolling pin, 30 x 30 cm (or a little smaller) square baking tray, baking paper


Preparation
Sift together into a large bowl the strong bread flour, the all-purpose flour and the salt. Add the sugar and dried yeast and stir with a spoon.
Make a well in the center of the dry ingredients and add the olive oil, the milk, the egg white and the water. Begin mixing the ingredients by hand by bringing the flour slowly towards the liquids, incorporating them and forming a soft, sticky dough.
Turn the dough out onto a lightly floured surface and knead it for about 7 minutes or until it is smooth and elastic. It's ok if it's ever-so-slightly (but no more than that) sticky.


Note: I hate to say this but not all flours are the same. The amount I used might not be enough for your dough to become smooth and elastic. So don't worry if you need to add a little more flour or even add a little more lukewarm water if your dough turns out a bit too firm. What is important is that your dough doesn't become too firm (because it will not rise properly) or too sticky. It must be smooth and elastic.

Brush the inside of a large bowl with olive oil using a pastry brush, shape the dough into a ball and put it inside the bowl. Brush the surface of the dough with a little olive oil and cover the bowl with a tea towel. Place the bowl in a warm place (I placed it just above the open door of my oven, with the oven turned on to 150 degrees Celsius) for about 1 hour, or until the dough has doubled in size.

Turn the proofed dough onto a lightly floured surface, punch it down and using a knife, cut and divide the dough into four equal pieces. Using your hands, shape them into cylinders and then using a floured rolling pin, roll them out into a strip (11 cm wide, 42 cm long, 0.3 cm thick).

Place ¼ of the feta along the center of each strip lengthwise. Dampen the edges of the dough with a little water using your fingers, fold and pinch the edges together around the cheese to form four long rolls.


With the seam side down, wind the roll to form a coil and tuck the end of the roll under the edge of the coil. Keep the coil ever-so-slightly loose to aid in the final rise. Do the same with the rest three rolls. Line the baking tray with baking paper and place each spiral onto the baking tray, spaced apart and seam side down.

Brush the tops and sides of the spirals with a little olive oil, cover with a tea towel and leave in a warm place to rise for about 40 minutes or until doubled in size.


Preheat oven to 200 degrees Celsius.

Beat the egg yolk with 1 tsp tap water in a small bowl and once breads have proofed, brush the tops and sides with it. (If you want your cheese breads to have a light-colored crust then skip the egg wash and instead sprinkle them with a little water). Sprinkle with the sesame seeds and place the baking tray on the lower rack of the oven. Bake for 10 minutes and then move tray onto the middle rack of the oven and bake breads for 30 more minutes. You may want to put a piece of aluminum foil on top of the spirals because the egg wash will make them turn golden brown in no time. In case you skip on the egg wash then you'll probably not need the aluminum foil. Just keep an eye on them because they might catch, either on top or on the bottom.

When breads are ready, take them out of the oven, out of the tray and onto a wire rack to cool.

Eat them when they have slightly cooled.
They keep very well until the following day, I wouldn't suggest reheating them though. They are best eaten at room temperature the next day.


Sunday, September 12, 2010

With a simple egg

My relationship with eggs has always been tumultuous. It's a love-hate thing that goes on for years and years. We've had our good times (my mom's sunny side up eggs with French fries), our bad times (plain omelettes) and our really bad times (food poisoning).


Like in all good love-hate relationships, there is also the element of surprise—an unexpected, and hopefully positive, discovery about your frenemy. In this relationship, the surprise came when I finally decided to eat poached eggs.


This blog is sometimes all about my late discoveries of food that people have been eating for decades and sometimes even hundreds of years. I'm a bit stubborn when it comes to tasting certain foods or dishes but when I finally do, one of two things can happen. Either confirm the fact that a little stubbornness is, after all, good or prove that I'm quite insane for not trying something for so long.


The latter applies in this circumstance. Why has my dislike for eggs kept me from trying this? Why don't people who regularly eat poached eggs shout it from the rooftops so the rest of us can hear? Poached eggs are delicious. And no, I haven't been living under a rock; it's just that we Greeks don't eat poached eggs. It's just not in our food culture.


But I think I'm getting carried away. Ok listen, it's an egg. We're not talking about a revolutionary flavor here. It's not like I'm suggesting the sixth basic taste* has been discovered. But for an egg skeptic like me, that was a breaking point. I can now safely say that I have a thing for eggs. Poached that is.


You take an egg, a simple chicken egg, and you drop it inside a pan filled with barely simmering water. The gentle swaying of the egg white that dances inside the scalding hot water looks like a ballerina twirling around in her tutu. The yolk disappears inside its white blanket and then, as you take it out of the water, it wobbles like a wonderfully set panacotta.


And what if that poached egg is being placed on top of something even more exciting like French toast or if you're feeling a little fancy 'pain perdu'? And what if that 'pain perdu' had been covered in parmesan and had been baked in the oven? And what if someone (uh, me) had the brilliant idea of adding some slices of prosciutto to the whole thing? Well, then you'd be in food heaven, wouldn't you?


Tasting the ultimate breakfast, brunch or even dinner—that's what this is. A complete meal, a unique dish with its own star—the poached egg. When you slice it open with a knife, the runny yolk reveals itself, oozing out like lava running down a snow peaked mountain. Its velvety texture is reminiscent of a perfectly cooked fried egg but without the oiliness. There's another texture to it, an airy, light quality that balances immaculately with the French toast, the prosciutto, the parmesan, the rocket. That's the beauty of the poached egg.


Do not tell me that you don't want to rush to your kitchen and make one right now. I wouldn't believe you.


Baked Savory Parmesan French Toast with Poached Eggs, Prosciutto and Rocket Salad
Adapted from Gourmet

The day before I made this dish I had baked two loaves of dense, crusty white bread with cornmeal. It was the perfect kind of bread for this dish. You can also use French baguette or country-style bread with thick crust and dense texture. Make sure that the bread is a bit stale (bought/made the previous day). If it is too fresh it will disintegrate when soaked in the custard.

There are many ways to poach an egg, like in plastic wrap or in special egg poachers, but the traditional, old-fashioned way and my own personal favorite is the one I'm describing below.

The first time you poach an egg it might not be a pretty sight but you'll get there. When I first tried it, it looked like an egg massacre. With a little persistence and a little patience you'll be poaching eggs in no time. I haven't been doing it long myself but I think I'm on the right path. If I can do it, you can too!

If you're having this dish for breakfast or brunch, accompany it with a glass of freshly squeezed orange juice.


Yield: 4 servings

Ingredients
1-2 Tbsp unsalted butter, softened, for greasing the baking dish
4 slices white crusty bread with dense texture (10 cm x 7 cm slices** with 2.5 cm thickness)
5 medium-sized eggs, at room temperature
235 ml (1 cup) whole milk
35 g (½ cup) parmesan cheese, grated
1 Tbsp and 2 tsp white wine vinegar
8 slices of prosciutto di Parma
45 g (about 2 cups) rocket leaves
1 Tbsp olive oil
Salt
Freshly ground black pepper


Preparation

Prepare the French toast
Butter the bottom of a shallow baking dish or tray and arrange the bread slices in one layer inside the dish.
In a medium-sized bowl, add 1 egg, the milk, ¼ tsp salt and ¼ tsp freshly ground black pepper. Whisk everything together until combined.


Preheat your oven to 200 degrees Celsius.

Pour mixture over the bread slices and press lightly with your fingers to help bread absorb the custard. Then turn the slices around and press lightly again. Sprinkle them with the grated parmesan and let stand for around 20 minutes until the custard is absorbed by the bread. (Don't worry if there are a couple of tablespoons of custard that the bread slices didn't absorb).
Bake the bread slices on the lower rack of the oven for 18-20 minutes or until the bread has puffed up and become golden brown.

How to poach the eggs
In the meantime start poaching the eggs.

Make sure you use fresh eggs since the egg white of fresh eggs tends to cling more strongly to the yolk. Also, it is best that your eggs are at room temperature rather than cold (from the fridge) because they will need less time to cook.

Crack one egg in a small container such as a ramekin or a small bowl. This way if your egg yolk breaks, you can replace the egg easily than if you had cracked the egg directly into the simmering water.
Fill a medium-sized, heavy-bottomed saucepan with water, at least 5 cm deep and up to 7, and bring to a bare simmer over medium-high heat. If the water comes to the boil instead, lower the heat and wait for it to reach a steady bare simmer. (If you add the egg to the water when it's boiling then the egg will disintegrate). You don't want any kind of bubbles coming up to the surface of the water. You want to see tiny bubbles at the bottom of the pan. Adjust the heat accordingly.


Add 1 Tbsp of the white wine vinegar to the water (this will help the egg white to congeal more easily). Create a whirlpool by swirling the water with the help of a slotted spoon or spatula (this will help the egg stay together as the white will wrap around the yolk, hopefully!). Slide the egg inside the water, right in the middle of the whirlpool (not when it spins too fast because it might break up the egg, but when it calms down a bit) and as close to the surface as you can possibly can. Using your slotted spoon, gently guide the egg whites toward the yolk (don't move the spoon around too quickly in the water cause you'll break up the egg). Do not panic if the egg white spreads out a bit like an octopus' tentacles, it is normal.
In case the egg gets stuck at the bottom of the pan, slide your spoon gently under the egg and tug it. Do this when the egg has slightly set (after 40-50 seconds).

A medium-sized egg at room temperature will take 2 ½ - 3 minutes to cook (for runny yolks with firm whites). Adjust the cooking time depending on how you prefer to have your eggs.
Once the egg is cooked, remove it from the water with a slotted spoon and place it on folded kitchen paper to drain. Don't place it immediately on top of the French toast because it will become soggy. Before adding it to your dish, you may want to trim the egg into shape using kitchen scissors or a knife.

Poach the rest three eggs in the same manner.

If you want to prepare many eggs for a large number of people or if you just want to poach your eggs in advance (let's say the night before for the following morning) then once the eggs are cooked, put them in a bowl filled with iced water and some ice cubes. This will stop the cooking process thus avoiding overcooked eggs. Place the bowl in the refrigerator and at this point you can keep your poached eggs for 24 hours. To serve them, place them in hot water (not boiling water) for about 40 seconds in order to reheat them.

Serve the dish
Toss the rocket leaves with the olive oil and 2 tsp of white wine vinegar. Place a piece of French toast on each of four plates. Add a poached egg on top and place two slices of prosciutto on each plate. Divide the rocket salad among the four plates. Season the eggs with salt and freshly ground black pepper and serve immediately.


*The five basic tastes are: sweet, bitter, sour, salty and umami. The word umami is Japanese and it means "good flavor". The umami taste has been discovered in 1908 by Dr. Kikunae Ikeda, a Japanese scientist and is defined as a savory, meaty or brothy taste found in foods like meat, parmesan cheese, mushrooms, soy sauce, green tea and others, that is imparted by glutamate (an amino acid). In the '80s, various studies proved that umami constituted a legitimate fifth basic taste.
A further two distinct tastes have been proposed to exist by scientists. The "fat" taste and the "metallic" (or "calcium") taste. According to findings, it appears that people who are highly sensitive to the taste of fat, tend to eat less of it.

**In case your bread slices are smaller, you can use two slices per person.


Friday, September 3, 2010

Flavors speak louder than words

When I first moved to Holland, there was a restaurant right down the street from where I lived and whenever I walked by, it was always packed with people who seemed to be having a good time and enjoying a pretty good meal. The aromas traveling outside the restaurant made me dizzy and a little weak in my knees. They were so inviting, so appetizing. They were titillating smells that made me crave whatever kind of food was being served inside.


Whenever I sneaked a peek to see what people were eating, I was looking at rice dishes with lots of vegetables and small meat skewers with dipping sauces, and knew it was some kind of Asian food. I didn't know exactly what though. I was intrigued and so was S but we never made the decision to have dinner there. Not until last summer when we finally had enough of speculating.


As I called to make a reservation, it dawned on me that I still didn't know what kind of food they were serving. So, I asked the surprised lady who picked up the phone and her answer was, "Indonesian". Indonesian? I had no idea what Indonesian food was. Was it super spicy? Was it like Indian food, anything like Chinese food, or was it like Thai? I had no clue but I was kind of excited.


And rightly so. The dishes we got served up were amazing and... hot. A collection of different small dishes that comprised of lots of rice with various sambals (spice relishes), hot curry sauces, marinated meat on skewers called satay alongside an array of hot and sweet dipping sauces, all kinds of vegetables, pickled or stir-fried, lumpia (pastries much like spring rolls), perfectly cooked fish dishes and the most delicious fruit desserts. I was experiencing a revelation and I couldn't believe what I was missing out on all this time. I absolutely loved those new flavors and couldn't wait to discover more things about Indonesian cuisine.


Indonesian cuisine greatly varies by region and combines many different influences from India, the Middle East, Europe and China. The Portuguese, the Spanish and later the Dutch who colonized Indonesia and traded the spices found there (like nutmeg and clove), brought with them from home ingredients like string beans and cauliflower as well as peanuts, chilies, tomatoes and corn from the New World (the Americas). All these ingredients were incorporated beautifully into the already rich diet of the Indonesians which of course included the almighty rice.


Rice is Indonesia's most important staple food and is usually fried, boiled or steamed. Fish and shellfish are of course eaten regularly since they can be found in abundance—Indonesia is a collection of about 18,000 islands. Red meat is eaten sparingly and mostly in the form of a curry or marinated and cooked on skewers (satay). Tofu and tempeh (a pressed soybean cake) are widely used in salads and soups, and coconut milk comprises and all-around thickening agent for sauces and curries and an essential cooking ingredient. Vegetables, herbs and spices are paramount in Indonesian cooking, with tamarind (a seed pod from the tamarind tree that has a sweet and sour flavor), lemongrass (looks like fat spring onions but has woodier stalks and has a sweet, subtle lemon flavor. It can be eaten whole, sliced or pounded to a paste), coriander, turmeric, cumin and galangal (a root from the ginger family) being among the most widely used. Relishes and sauces like sambal oelek (a hot chili-based sauce) and kecap or ketjap manis (sweet soy sauce) accompany most dishes in Indonesian cuisine.


Indonesian cuisine is known for its deliberate combination of contrasting flavors and textures. This salad here is just that. A combination of perfectly balanced and flavorful ingredients with different textures. I love this salad. It's exotic, spicy, healthy, fragrant, hot, crispy and refreshing. It is all you need from a salad and then some.


All the vegetables, with their distinct, deliciously fresh and unique flavors make the salad extremely nutritious, fulfilling and a wonderful treat for vegetarians. The spice dressing adds heat and acidity as well as sweetness and earthiness to the dish. It is powerful and luscious and marries impeccably well with the crunchiness of the colorful vegetables. Serve this salad for lunch or a light supper, or serve it alongside an Indonesian main dish such as beef satay.


As I was draining the spinach, this little creature showed up out of nowhere... It's times like this that I wish I had a better camera


The first time I prepared this salad and put it down on the table, S glanced at it, then looked at me and said, "It is too raw for me". I replied, "It's a salad. They usually are raw". He was of course referring to the green beans and snow peas. Granted, the snow peas were raw but the green beans were blanched. That's hardly raw. And then he took the first bite. I knew he was instantly converted as I saw a smile appearing across his face. The next sound he made was a simple "mmmmm". Need I say more?


Indonesian Hot & Fresh Vegetable Salad with Spice Dressing
Adapted from The Essential Asian Cookbook

Those of you who are apprehensive about spicy or Asian flavors, please don't be. This salad may be hot and spicy but it is unbelievably fresh and delicious. In case you can't handle the heat of the chilies use less amount.

If you can't find brown rice vinegar (in Asian food stores) you can substitute with balsamic vinegar.
If you can't find snow peas (also known as mangetout) you can substitute with sugar snap peas.
You can either use fresh baby corn or canned baby corn in brine.
You can substitute peanut oil for corn or sunflower oil but the flavor of the dressing will be less authentic since peanut oil has a unique flavor.

This salad is totally adjustable to whatever bright-colored, crisp, fresh vegetables you have available. You don't have to restrict yourselves to the ones used here. Use carrots, cabbage, raw courgettes (zucchinis), cucumber, yellow or orange peppers and vegetables that you can blanch. Use your imagination and your own personal taste.

I would like to introduce a new page on my blog which is the "How-to and Tips" page. You can find a link here and at the right column of the main page. I have added some tips on how to handle chilies and I will be adding more tips along the way. I hope you'll find them helpful!


Yield: 4 main-course or 6 salad-course servings

Ingredients

for spice dressing
2 Tbsp peanut oil
1 large garlic clove, crushed
1 ¼ tsp fresh ginger, grated
½ long red hot chili or 1 small Thai red chili, thinly sliced (read this)
2 Tbsp desiccated coconut
1 Tbsp brown rice vinegar
80 ml (1/3 cup) hot water
1 Tbsp kecap manis* (optional)

for salad
300 g green beans
100 g snow peas (mangetout)
150 g baby spinach leaves
1 medium-sized red onion (80-90 g)
1 large red bell pepper (about 100 g)
100 g bean sprouts
7-8 baby corns
3 green onions, white and pale green parts only


Preparation

Make the spice dressing
Heat the peanut oil in a small saucepan over medium-high heat. Once the oil starts to shimmer add the garlic, ginger, chili and desiccated coconut. Lower heat to medium and stir-fry (fry by continuously stirring the ingredients around the pan) for 1 minute. Add the vinegar and water and simmer for 1 ½ minutes. Remove pan from the heat and add the kecap manis (if using). Allow the dressing to cool in the pan before adding it to the salad.


Prepare the salad

First of all you need to rinse all the vegetables thoroughly under running water.

Top-and-tail (cut off the ends of) the green beans and then cut them into 7-8 cm lengths. Boil 200 ml of water in a large pot over high heat. Once the water starts to boil, add the green beans and blanch them for 1 ½ minute. Drain them and let them cool.

Top-and-tail (cut off the ends of) the snow peas.

You can remove the stems from the baby spinach leaves if you wish, and if you're using larger spinach leaves you can slice them thinly.

Cut the red onion in half lengthwise and thinly slice it.

Cut the red bell pepper into thin strips.

Cut the green onions in an angle into 5 cm lengths.

Assemble the salad and serve
Combine all the vegetables in a large serving bowl and add the spice dressing on top. Toss until combined and serve.


*You can find kecap manis (Indonesian sweet soy sauce) in any Asian food store. If you can't find it and you want to add some extra sweetness to the dressing, you can add 1 tsp of dark brown sugar when you add the vinegar and water to the saucepan.